Friday, December 19, 2014

Family History Software Sale for the Holidays

Wanting to share your Family History/Genealogy with family members? Now is the perfect time with our holiday special of $10 dollars off of the regular price.

Time has a way of slipping by so quickly and you have worked hard to find the ancestors in your family, it might be time to introduce the next generation to all your discoveries so they can learn of them, what their lives may have been like and their families.

Sharing is also a way of preserving all you have done regarding research and methodically sifting through documents and records to place the correct people in your family files.

Gift the gift of Family History this year...


To take advantage of this promotion, click Ancestral Quest.

Enjoy the holiday season by reaching out to the next generation!

Remember Ancestral Quest is fully FamilySearch Certified!


Comments and questions are always welcome!


Happy Ancestraling...

Claire ;)

AQ Cues & Clues Blog:http://ancquest.blogspot.com/


Wednesday, November 26, 2014

Photos Enhance Your Family File..


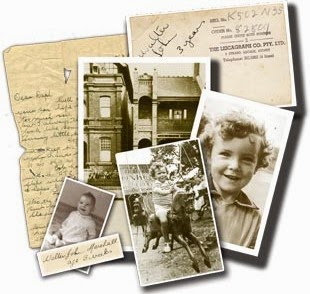
When it comes to bringing your research to life, photos and stories are one of the easiest ways to accomplish this single event. 

Holidays are the perfect time to take additional photos of family members especially since no one knows how long we will all be here.

Pictures around the table at Thanksgiving and Christmas are but two of the main holidays that seem to bring families of all generations together.

As one sits around the table, often stories of times past as well as present are shared, thoughts of gratitude for all that has happened since the last year also come into play making this another great opportunity to make a permanent record of the events of the day.

Digital cameras come on cell phones, iPhones, tablets and on the cameras themselves making it so easy to quickly take those favorite pictures that may never be recreated going forward.

Once they are taken and the stories recorded, another feature on most cell phones, they are easily added into the "Scrapbook" section of Ancestral Quest. 

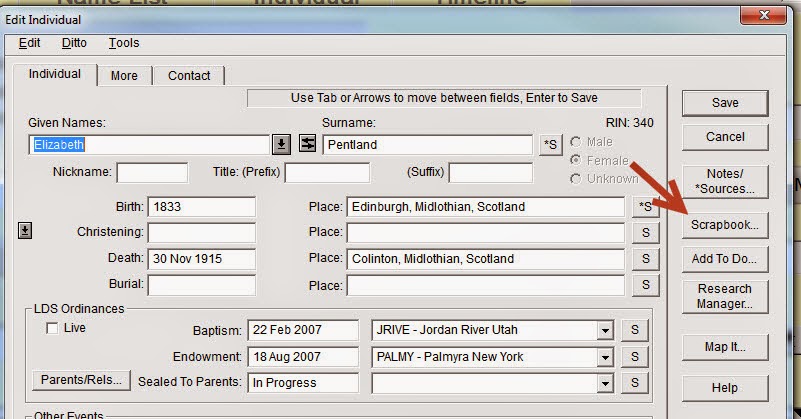
When you go to add a person or edit them, that feature is on the right hand side as follows:

Add caption
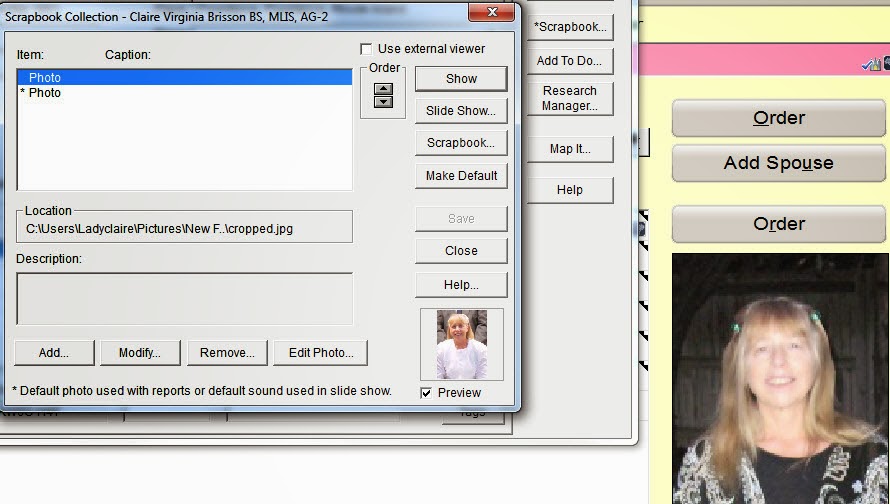
Clicking that button brings you to the place where you can easily add your photos:


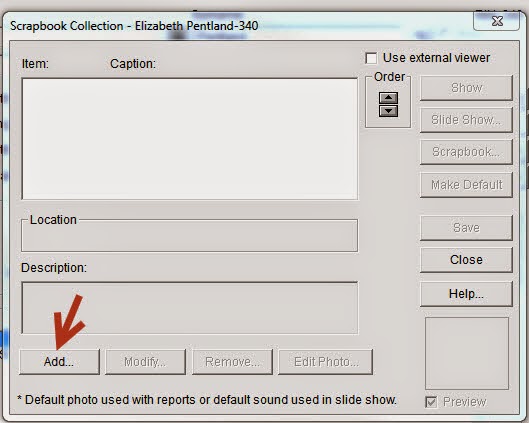
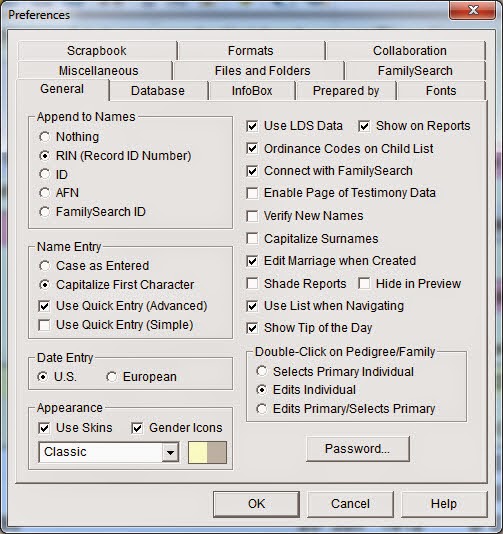
Clicking on Add brings you to where you can choose the type of file you are adding and its location on your computer:


Note that there are choices but since you are most likely adding a Photo, you would just click on Photo. Next you click on "Browse" to locate the picture on your computer. Once you have that you should fill in the "Caption" and a "Description". This is where you can add more details about the picture for yourself and future generations. 

Once you click "OK" the picture will show up in a "Preview" if that box is checked and you will be able to view it in the "Family" view. It also will be available if you want to create a Scrapbook of all your photos or just multiple photos of one person. Note that if you have multiple pictures of one person, you will have to designate which one you want to show as the default picture.


As you can see from the above, I have 2 pictures in my scrapbook collection and one is starred which is the one shown in my family view, the other one is highlighted in the scrapbook collection and is shown in the preview.

In the description area one can add stories, etc. or put the stories in the notes.

Enjoy the holiday and don't forget the pictures!

Remember Ancestral Quest is fully FamilySearch Certified!


Comments and questions are always welcome!


Happy Ancestraling...

Claire ;)

AQ Cues & Clues Blog:http://ancquest.blogspot.com/


Friday, November 14, 2014

Confusion: Using a PAF file or an AQ file?


You are using Ancestral Quest, you installed the program, located your PAF file and have been working on your family file ever since. 

As you continue to use Ancestral Quest you think you have an Ancestral Quest database, after all you are using AQ to add, link, etc. but unless you have converted your PAF file, you are still using a PAF file and missing out on features that work for an AQ file but not a PAF file.

Limitations on continuing to use a PAF file inside of AQ are as follows:

In the Edit menu, the following are disabled:

  • The Quick Entry (Advanced) feature is not available
  • Replace Names/Dates/Places
In the Tools menu, the following are disabled:
  • Color Coding
  • Tags
  • Convert Names to Mixed Case
  • Convert Place Abbreviations
  • Change Log
  • Database Check/Repair (you can open the database within PAF and use PAF's Check/Repair tool)

To check to see what kind of family file you are working on go to File,  scroll and click on "Properties", the menu that comes up clearly shows you exactly what type of file you are are working with by the extension; either .paf for a PAF file or .aq for an Ancestral Quest file or .ac for an Ancestral Quest Collaboration file.


Converting your file is not difficult and the process will leave your PAF file in tack, make a copy and change the copy to a .aq file. Go to File, scroll and click on "Database Converter":


The process provides for you to name the file and then convert the file resulting in you now fully working with an AQ database and being able to use all of the features of the program.

As you continue the learning process of adjusting from PAF to AQ, you'll notice many new and additional features to make family history even better!


Remember Ancestral Quest is fully FamilySearch Certified!


Comments and questions are always welcome!


Happy Ancestraling...

Claire ;)

AQ Cues & Clues Blog:http://ancquest.blogspot.com/

Thursday, November 6, 2014

Downloading Confusion?


When it comes to updating and downloading it can be confusing for those who are new to a program. Ancestral Quest is no different and it has 3 types of files to choose from when downloading for the first time or even updating to the latest version.

The screen one gets to for downloads looks like this:


If one looks carefully, each choice is explained, however, sometimes the explanation given is just not enough so lets take a closer look at each one.

The first one is called the "The Streamlined Installer for AQ 14". This is most likely the one individuals should choose unless they want to get involved with Collaboration. New individuals may not even know just what this is and so it is a good thing to begin with downloading and installing this first choice.

The second one is the "Collaboration Support Installer" and one can download and install this separate from the first one.  The program knows how it is connected to the original "Streamlined Installer". Collaboration is a way to have others help with one's genealogical research, to learn more about this feature check out our web page on Collaboration.

The third choice is the "Complete Installer" which has both the Streamlined and the Collaboration together in one download and one installation process.

Hopefully this will help those who struggle with deciding which one to choose whether they are downloading for the first time or just updating to a new build.


Remember Ancestral Quest is fully FamilySearch Certified!


Comments and questions are always welcome!


Happy Ancestraling...

Claire ;)

AQ Cues & Clues Blog:http://ancquest.blogspot.com/

Tuesday, October 28, 2014

A GEDCOM File: One of the Ways to Share Your Genealogy Files


The above is the symbol for sharing...there is no symbol for GEDCOM and yet that is one of things you can do when you create a GEDCOM file from your own family file database.

Most people know that sharing genealogical information can be difficult. If one shares a paper family group sheet or a typed on, the chances of that information being retyped incorrectly, even accidentally is great. 

Back in 1984, GEDCOM was developed by The Church of Jesus Christ of Latter-day Saints and an aid to overcoming obstacles of sharing genealogical information with others.

GEDCOM stands for "Genealogical Data Communication" and is a simple plain text file that contains one's family information.

Over time, all genealogical software programs supported the ability to create a GEDCOM file within the features of that software program and became the standard for many years with some improvements along the way. There has been efforts to improve this file exchange but as of now it is still the industry standard. Wikipedia has a great article on it worth reading if one is interested in the history of this file format.

To create a GEDCOM in Ancestral Quest, one simply goes to "File" and "Export" and uses the menu box that comes up to choose what and what not to include in the actual export of the family file. This is how it looks:


Presently all the boxes are checked, but in reality one would need to be very careful of what to allow. For instance, unchecking "Full Info on Living" might be appropriate if you don't wish to share living information. "Confidential Data" and perhaps "LDS Data" should be unchecked depending on who one is sharing with.

Notice that one can also choose to only send a family or just a small amount of individuals by clicking on the "Partial" and then "Select" button. This would allow one to pick and choose only those in the family file wanting to be shared with that particular person.

"All" might be used if one was uploading their family file to an online database like Ancestry.com or MyHeritage.com and any others. One would still have to be careful not to share "Living Information" especially without their permission.

From this point after you have made your selections, click on "Export" at this point you will given the ability to name your file and press "Export" one more time so it can create your file. The usual place that these files are saved in is "My Documents", however, you can change it to wherever you wish it to be saved.

Once this is created, it now can be shared either with another person or an online database as mentioned already.

That is how simple it is. Next week we'll discuss what to do with a GEDCOM file you receive.


Remember Ancestral Quest is fully FamilySearch Certified!


Comments and questions are always welcome!


Happy Ancestraling...

Claire ;)

AQ Cues & Clues Blog:http://ancquest.blogspot.com/


Monday, October 13, 2014

Duplicates...Uploading whole Gedcoms is NOT a good thing


Many individuals have family files of their ancestors and want to make sure it is "added to the FamilySearch Family Tree" sharing is a good thing.

However, there are times when one needs to think about what they are doing. 

While individuals think it is an easy way to add their tree to Family Tree, if you use FamilySearch Family Tree, it is now done through the Pedigree Resource File program to prevent duplicates. Here is a link to those instructions.

Genealogical software programs like Ancestral Quest also allow you to upload your records but caution you to do this in small groups so as to prevent duplicates. Here is a screen shot of that menu:


The caption right on the menu states: 

While you can try to match all records in your current database with FamilySearch, it is recommended that you work with smaller groups of ancestors. To do this, use the Select options.

Again the reasoning is duplication. If there are individuals added to the FamilySearch FamilyTree they will have to be merged either by the one adding or another who will find it when looking for the same ancestor.

When you click on the 'Help' button, it will easily explain how to use this feature.

Think before you share "ALL" your ancestors and help to prevent duplicates in the FamilySearch Family Tree!

Remember Ancestral Quest is fully FamilySearch Certified!


Comments and questions are always welcome!


Happy Ancestraling...

Claire ;)

AQ Cues & Clues Blog:http://ancquest.blogspot.com/

(c) 1994-2014 Incline Software, All Rights Reserved
 gfindlay@ancquest.com


Friday, September 12, 2014

Setting Ancestral Quest Preferences


Setting one's preferences can help to make your software just the way you like it. If you don't adjust anything, the program will run fine but just with the defaults set and one may never have known there were choices to change colors, display date styles, place styles and even the size of the fonts can be adjusted. 

Go to "Tools" and scroll and click on "Preferences" which will bring up the following screen:


This is the "General" Tab where you can adjust the colors, add an ID, RIN or Family Search ID to a name and turn on the LDS features. You can also tell it which type of date entry you would like, US or European.


Under the "Database" tab you can tell the program which person to start with or just have it go to the last person you were on. When you turn on the "Log Changes" it keeps a record of all the changes you make to the family file and can be exported to a text file. This is often helpful. There are additional search features here as welll as saying how you want backup files to be named.


The next tab we'll discuss for this blog is the "Fonts" tab.


Here are you are able to adjust the fonts for the various screens in Ancestral Quest. From the notes and sources to the menu screens, just click the dropdown arrow and pick the one you need to change. Once you click what you want to adjust click on 'Change' and you can adjust the actual size of the fonts to your liking.

We will tackle a few other tabs in a future blog, in the mean time, feel free to explore them and adjust what you can to have a customized program!

Remember Ancestral Quest is fully FamilySearch Certified!


Comments and questions are always welcome!


Happy Ancestraling...

Claire ;)

AQ Cues & Clues Blog:http://ancquest.blogspot.com/

(c) 1994-2014 Incline Software, All Rights Reserved
 gfindlay@ancquest.com

Friday, August 29, 2014

Correcting Spelling Errors in Those Places...


Often when entering places wrong spellings are typed. The "Quick Data Entry" doesn't know that it is a misspelling and can come up when you try to enter the correct information in for that particular place and either frustrate you or make it almost impossible to spell it correctly.

To fix this, simply go to "Edit" and scroll down to "Quick Entry Place List"


This will bring up the following menu where you will be able to fix those mis-spelled places:


Notice the choices you have, Add, Edit, Delete Name, Delete All, and Referesh.

You highlight the wrong spelled place and edit it or delete it if you already have a correct spelling in the list.

Hopefully this will assist those who are having problems with misspelled place names. Once you are done, just close out the file.

Remember Ancestral Quest is fully FamilySearch Certified!


Comments and questions are always welcome!


Happy Ancestraling...

Claire ;)

AQ Cues & Clues Blog:http://ancquest.blogspot.com/

(c) 1994-2014 Incline Software, All Rights Reserved
 gfindlay@ancquest.com


Monday, August 25, 2014

Open, Restore, Import....Understanding How and When to Use them


When working in Ancestral Quest it sometimes can get confusing as to how to access one's database of names, dates and places.

People have files that end in .paf, .aq, .ged, .zip, .aqz and wonder why they many not 'open' under an 'open' command.

The reason they many not open is that they need a different command to do just that. 

The "File" menu has this drop down where you will find all of the right commands to help you open up your database files:


The files that end in .paf and .aq will open up with File and Open and then locating that file, double click it and you'l have all your family file information right there.

If you have a .ged file, this is a GEDCOM file and needs to be imported into a blank database. So one creates a new database and then goes to File and scrolls to 'Import', clicks it and locates that .GED file and again double clicks it. Once that is done the file will import into that blank database file filling it up with whatever is in the GEDCOM file.

If you have a .zip or .aqz file, this is a back up file and needs to be restored. One needs to go to File and 'restore', clicks it and locates the zipped file and again double clicks it to restore your database files.

With the end goal to being able to access one's family database, it is helpful to use the correct commands depending on the type of file available and hopefully this blog has provided some help in doing just that!


Remember Ancestral Quest is fully FamilySearch Certified!


Comments and questions are always welcome!


Happy Ancestraling...

Claire ;)

AQ Cues & Clues Blog:http://ancquest.blogspot.com/

(c) 1994-2014 Incline Software, All Rights Reserved
 gfindlay@ancquest.com


Friday, August 15, 2014

Setting Your Preferences


Under the "Tools" drop down menu is where one can set some preferences with how they want their database to function. Once one scrolls down and clicks that option there is an array of tabs to choose from that allow changes to be made from the defaults that are pre-set in the program.

The first tab it defaults to in "General". Here you can say whether you want to attach RIN numbers or FamilySearch ID numbers to a person's name, have 'Quick Entry' set up which helps when entering in places as well as activating or not activating LDS features. Here is a screen shot:


You'll also note that one can adjust the color scheme and add a password if you wish. 


I usually don't use that password function as there are times one forgets and it is not that easy to retrieve it. Also note that there is a 'Help' box in case there is something under this tab that one is not sure how it functions. The "Help" function goes through each item and provides additional detailed information to help one decide whether to check it or not.

We'll cover the next couple of tabs in future blog posts!


Remember Ancestral Quest is fully FamilySearch Certified!


Comments and questions are always welcome!


Happy Ancestraling...

Claire ;)

AQ Cues & Clues Blog:http://ancquest.blogspot.com/

(c) 1994-2014 Incline Software, All Rights Reserved
 gfindlay@ancquest.com


Friday, August 8, 2014

Merging Duplicates Using AQ Intelligent Matching..


Merging individuals can be challenging if one is not quite sure how to proceed using this feature in Ancestral Quest.

Clicking on the Icon that looks like the one above will take you to the Merging screen which looks like this:


Taking a good look at this match/merge screen, one can choose how to proceed. In order to allow the program to find the duplicates, one can simply click on the "Enable Intelligent Matching" which will put a check in that box. 

You also can alter the way the program searches your database by clicking on "Options" which brings up the following menu or you can leave these settings as they are listed here:


The next step is to click "Next Match" which allows Ancestral Quest to search through your family files database and locate possible matches. Here is the first match it found from my own file:


Using the color coding at the top I see the entry that was on the left in Green and the entry that was on the right in Red, the Black shows what the resulting merge would look like in my family file database.

Looking close one can also see check marks and arrows. The "Legend" up in the right hand corner shows what those items mean:


If you want to change how the program is dealing with those items, one just clicks on the box and the mark that is in the box will disappear and that piece of information will just disappear. 

When you click on "Merge" the merge takes place and is reflected on the screen showing anything added to the notes or any changes to dates. The merge is now complete.

Clicking the next match allows you to continue with removing duplicates from your family file database and will continue to bring up duplicates until it finds no more. When done you simply click on "Close" and are returned to your program to continue with either research or whatever you wish to work on.

Take advantage of this great feature in Ancestral Quest to help you remove your duplicates!

Remember Ancestral Quest is fully FamilySearch Certified!


Comments and questions are always welcome!


Happy Ancestraling...

Claire ;)

AQ Cues & Clues Blog:http://ancquest.blogspot.com/

(c) 1994-2014 Incline Software, All Rights Reserved
 gfindlay@ancquest.com


Thursday, July 31, 2014

How to Remove Unwanted 'Unknown' Spouses


Sometimes when entering data one ends up with "unknown spouses", not sure why except that it happens. After doing research one realizes that there really is only one spouse not two or more so how does one fix this?

In the following example, there is no 'unknown' spouse married to Claes Cornelissen Van Schouwen:


One would think they could just delete the individual, however, when one right clicks on the individual to delete you end up with an UNKNOWN with no number so this is not the way to remove them.

The best way to remove them is to give them the same name as one that is correct and merge them, once you have merged them the 'Unknown' is no longer there. Where you do this it will ask you if you want to "Add this spouse to the current marriage?" The answer is yes so that you can merge the entry with the one that is listed there and correct. Note the RIN number which in this case is #5551.


With just the name in the 'unknown' entry, I now have RIN # 5300 for Margaret Van Der Goes and RIN # 5551 for Margaret Van Der Goes which just has her name there.

Now go to the "Merge" function by clicking on the "Yield Sign" Icon at the top:


You are now able to merge RIN # 5300 and RIN # 5551 together to remove that 'unknown' spouse. Clicking this Icon opens up the 'Merge' Screen. Clicking on the "Search" box for the left side enter in the RIN number 5300 and clicking on the "Search" box on the right side enter in RIN number 5551, the end result looks like this:


Note that the original RIN # 5300 is in green and states it is the Primary person while the duplicate, RIN # 5551 and states it is the Duplicate person, is red, once they are merged it shows you in black what the final results of the merge will be. 

Now click on Merge and Close...the end result is no more 'Unknown'!


These steps can be repeated as needed to remove those unknown spouses...


Remember Ancestral Quest is fully FamilySearch Certified!


Comments and questions are always welcome!


Happy Ancestraling...

Claire ;)

AQ Cues & Clues Blog:http://ancquest.blogspot.com/

(c) 1994-2014 Incline Software, All Rights Reserved
 gfindlay@ancquest.com


Thursday, July 24, 2014

AQ: Parent child Relationships


Sometimes there are 'other' relationships between parents and children and knowing where to show that in Ancestral Quest makes it easy to state just what that relationship is.

The trick is putting the child in the primary position like this:


Next is to click on "Other Parents/Rel" which is immediately to the right of the child. This is the screen you'll see:


Note that you can adjust the relationship of the child to the Father and the Mother separately as well as verify that relationship. The choices are as follows:

Biological
Adopted
Step
Foster
Guardian


It is that simple to put in the correct relationship between parents and children!


Remember Ancestral Quest is fully FamilySearch Certified!


Comments and questions are always welcome!


Happy Ancestraling...

Claire ;)

AQ Cues & Clues Blog:http://ancquest.blogspot.com/

(c) 1994-2014 Incline Software, All Rights Reserved
 gfindlay@ancquest.com